
Moving the EFI Partition to the C Drive in Windows 11: A Step-by-Step Guide
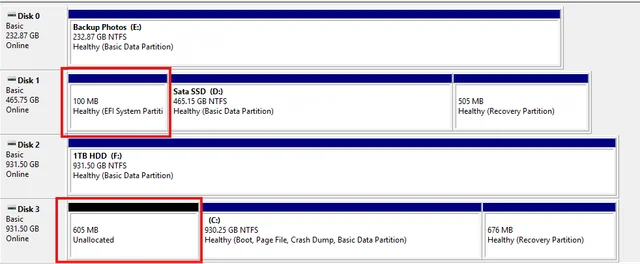
If you’ve found yourself in a situation where your EFI partition is residing on your D drive instead of the C drive, you’re not alone. This is a common issue that can arise during system setup or after making changes to your drives. Having the EFI (Extensible Firmware Interface) partition on the correct drive is crucial for a smooth boot process, especially since your system likely prioritizes the D drive over your NVMe-based C drive. In this article, we’ll guide you through the steps to move the EFI partition to your C drive, while also addressing that pesky 605MB of unallocated space.
Prerequisites
Before proceeding, ensure you back up any important data. Modifying partitions can result in data loss if something goes wrong.
Step 1: Check Partition Sizes
First, it’s essential to ensure that your C drive has enough space available. Since you mentioned having 605MB of unallocated space, you should verify its dimensions and confirm that this space can be allocated for the new EFI partition.
Step 2: Open Command Prompt as Administrator
To begin the process, you’ll need to use the Command Prompt with administrative privileges. Search for “cmd” in the Start menu, right-click on “Command Prompt,” and select “Run as Administrator.”
Step 3: Launch Diskpart
In the Command Prompt window, type the following command to launch Diskpart:
diskpartStep 4: Select Your C Drive
Next, you’ll need to select your C drive volume. Input the command below to do so:
select volume CTo check the status of your partitions, you can type:
list partitionStep 5: Shrink the C Drive
To create space for the new EFI partition, shrink the C drive. Given you want to utilize the unallocated space, you can run:
shrink desired=100This command reduces the C drive size by 100MB.
Step 6: Create the New EFI Partition
After shrinking, you will now create a new EFI partition. Enter these commands:
create partition efi size=100Step 7: Format the EFI Partition
Now format the new EFI partition with the FAT32 file system:
format fs=fat32 quickStep 8: Assign a Drive Letter
To access the EFI partition conveniently, assign it a drive letter:
assign letter=SStep 9: Copy Boot Files
Finally, transfer the Windows boot files to the new EFI partition with the following command:
bcdboot C:\Windows /s S: /f UEFIStep 10: Exit Diskpart
After all the commands have been successfully executed, type:
exitStep 11: Reconfigure the Boot Order
After moving the EFI partition, restart your computer and access the BIOS or UEFI settings. Change the boot order to prioritize the C drive.
Conclusion
By following these steps, you should successfully move the EFI partition from your D drive to the C drive, optimizing your boot process on Windows 11. This cleanup will not only help with performance but also streamline your drive management. If you encounter any issues, consider using partition management software or seeking further assistance.


Add comment